.
Scratchbuild Ford Anglia 105E
By Phil Wicks
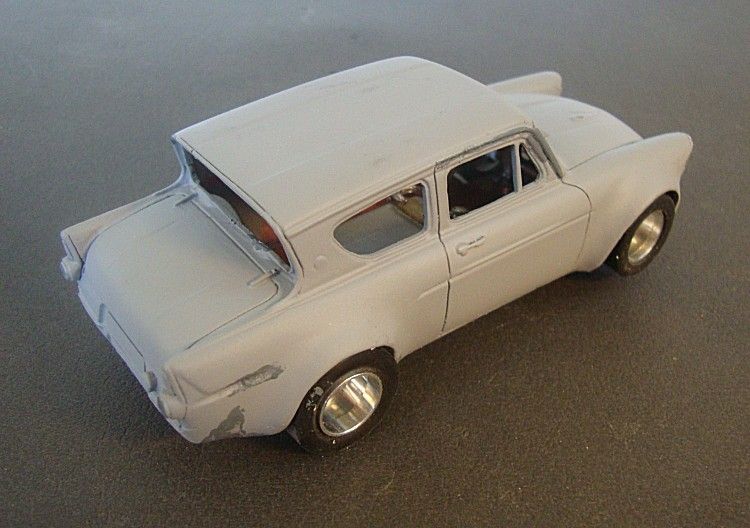
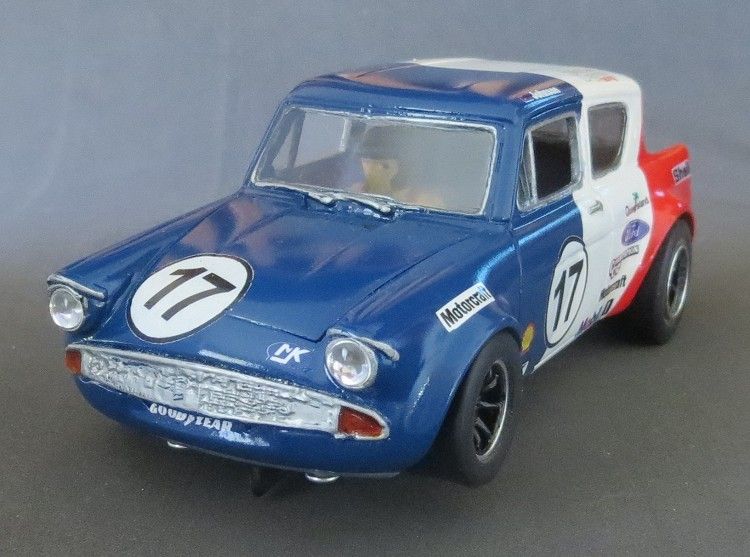
So I have been lucky purloining a Ford Anglia body from the best of sources. This car is a one off moulding from the guys at MJK carried out several years ago, but never, to my knowledge, went into production. The guys at MJK sent it to me with a bunch of stuff and after having it for a year or so, and looking for a new build, I decided to bring it to life and make the Anglia lovers out there so green with envy.
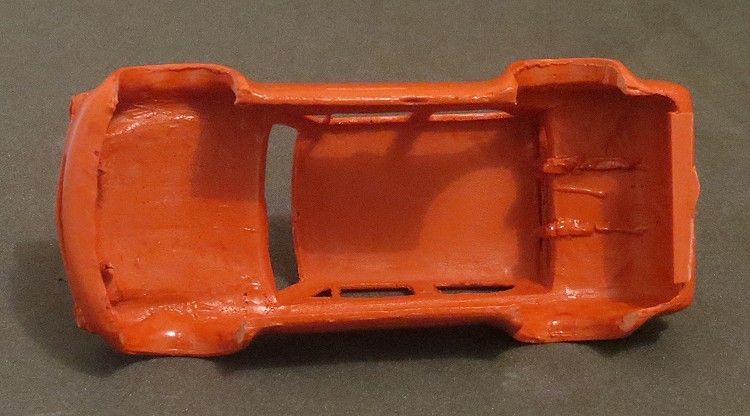
The body was an experiment some several years ago when MJK’s chief body maker decided to play a little and add flared arches to what must have been a diecast model from some time ago. The body I received was in particularly good order and there were only one or two places that needed fine tuning. But one issue was that no one ever got round to making the clear parts for the windows and screens. This is normally a vacuum formed part but for this model there was nothing…..this was going to be the biggest challenge.
First up was the body weight, being a body straight from the mould it had several areas that needed addressing to make the model a success, the main one being the body weight. The bare body weighed twenty six grams, and once a driver’s tray had been constructed and several coats of paint had been applied I could guarantee a finished body would weigh in at thirty five grams or more, so the first task was to reduce the body weight without impinging body strength.
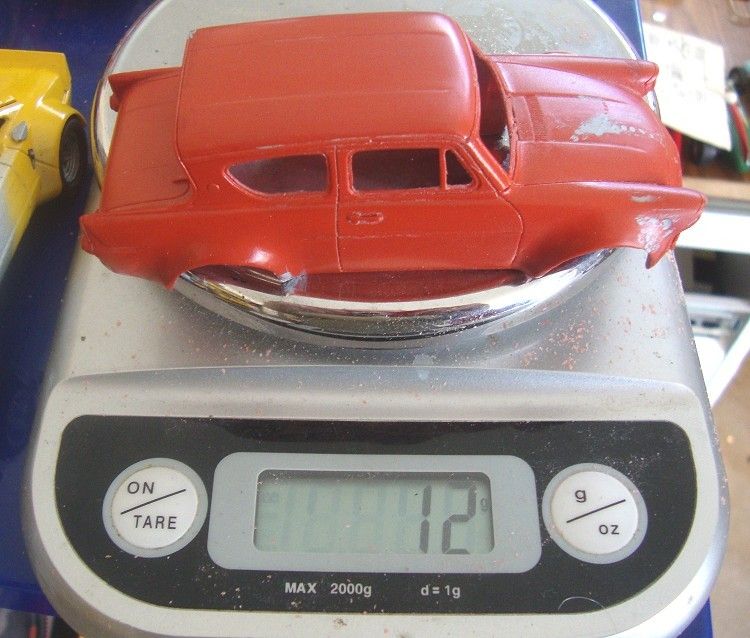
The tools were a dremel and various ball end bits and a curved modeler’s knife blade and handle. The bulk of the body weight was ground out. Care was taken not to go too thin. This was checked by constantly looking at the body under a strong light. It was easy to get a uniform thickness this way and the only care needed was to make sure the ball bit didn’t go through the body where the door, boot and bonnet seems were. When the ideal thickness was achieved, the thicker plastic at the front and rear valances was ground down and finally, with the modelers knife I scraped the insides of the model to achieve a smooth interior. Target weight was twelve grams for the bare body. This was achieved comfortably and would allow a drivers tray and clear parts to take it up to about 20 grams
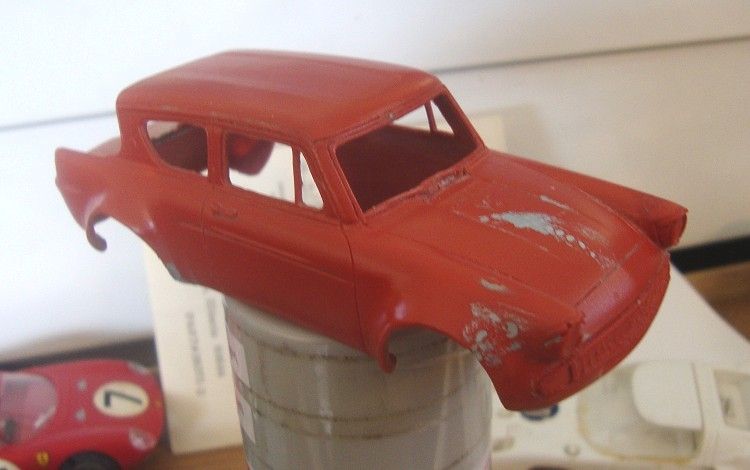
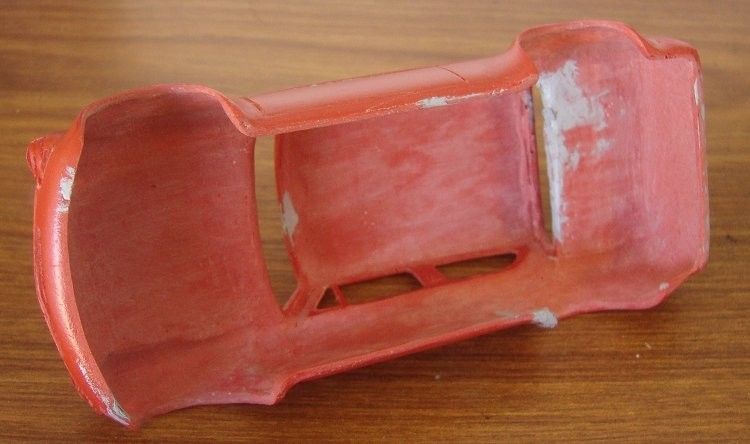
Next up was to fettle any defects in the exterior. Fortunately the moulding was quite good and only left a couple of patches to be tidied. The grille at the front was a bit of a mess and after contemplating a remedy for more than several minutes I decided to leave it as it was as this model was for the track, and the exercise was to build a drivable model and not a pretty one. Should the model make it to retirement, then, I might consider tidying the front grille.
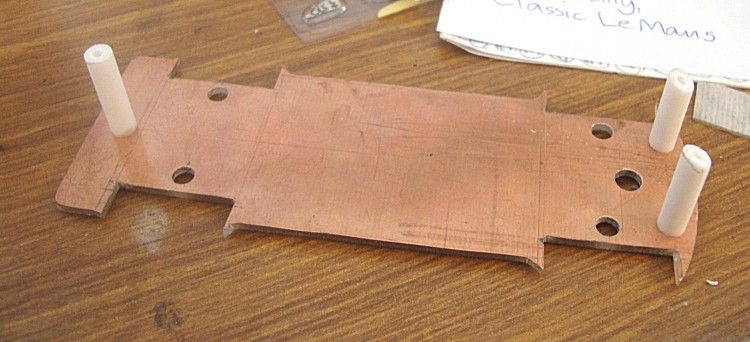
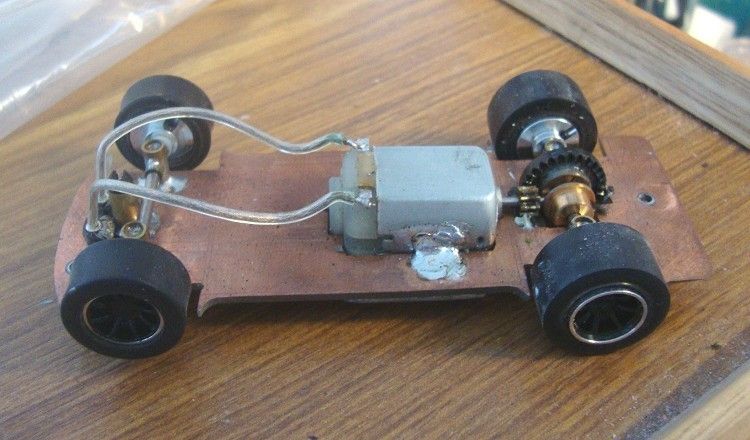
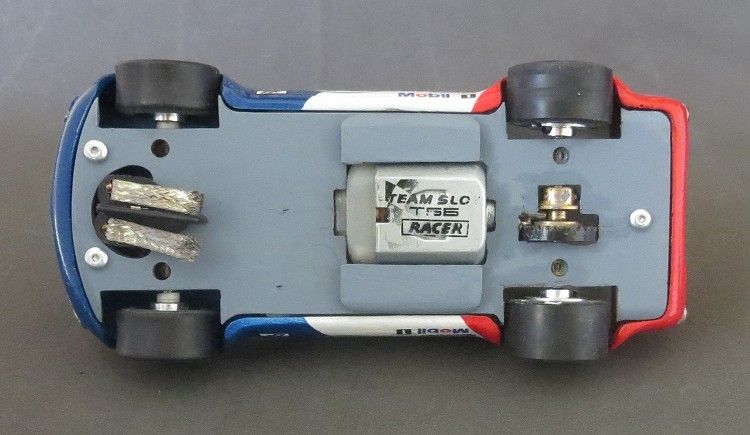
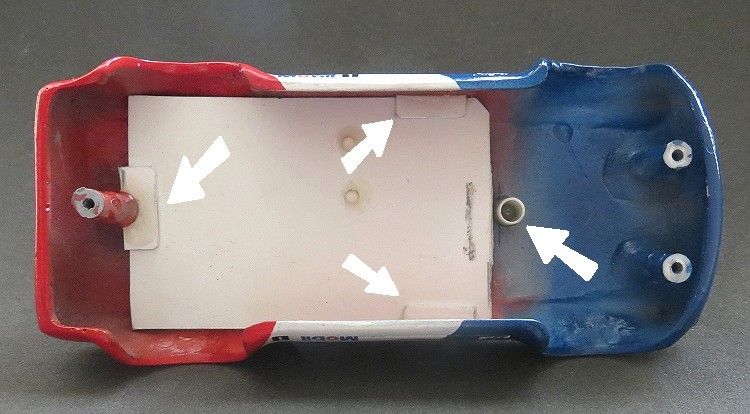
All the regulars will be familiar with my PCB chassis by now and careful attention to measuring and cutting should see a very usable chassis take shape. Body mounting posts are fixed to the chassis and the posts trimmed to get the chassis a snug level fit in the body.
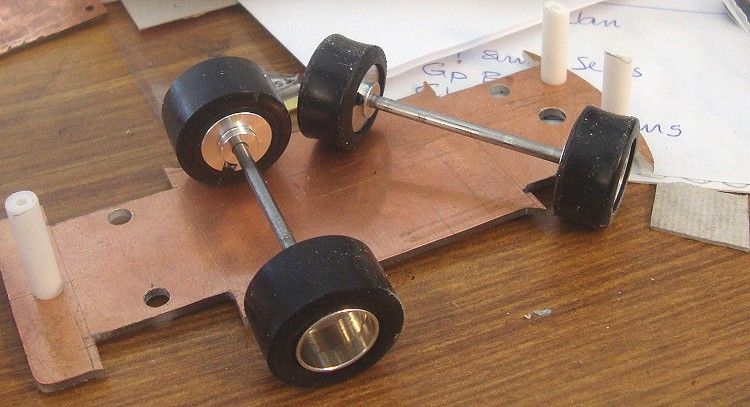
Wheels and axles have already been selected from MJK’s range of accessories and once the axle widths had been trimmed to get the wheels to fit under the arches, the chassis was then marked and cut to get the best fit on the chassis.
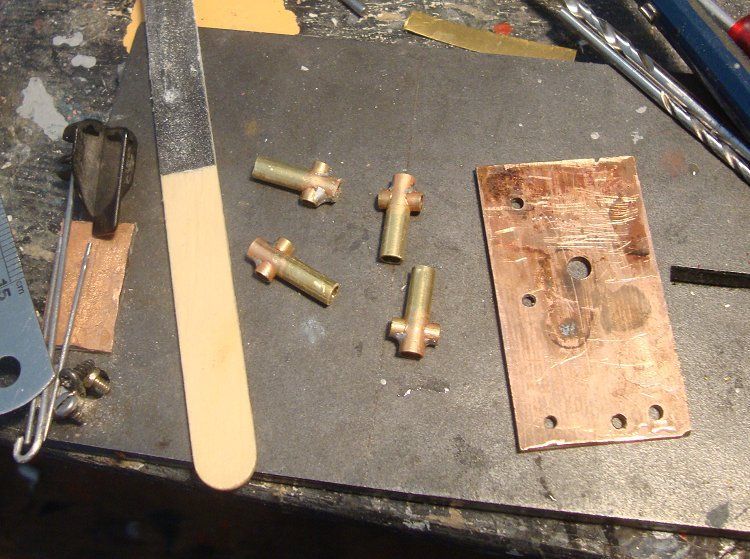
Old familiar techniques have been used to create the axle mounts. These will be soldered in place once all the other parts have been soldered to the base.
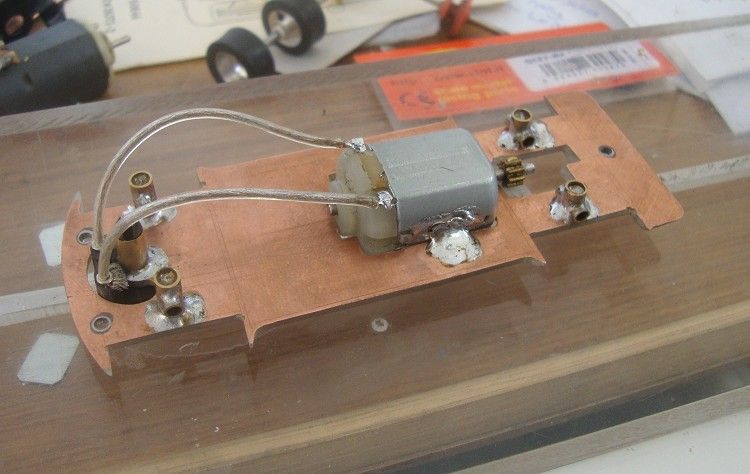
This is the chassis minus the wheels and tyres, on this occasion I have lined the screw holes for the chassis mounting positions with some plastic tube, the intention being to see if it reduces the noise level (which is not bad anyway) buy cushioning the screws against the resin of the chassis.
The motor I decided to use is one of team slots contributions. It is about 17,000 rpm with moderate torque; the idea being to create a model which is a pleasure to drive and not a handful!
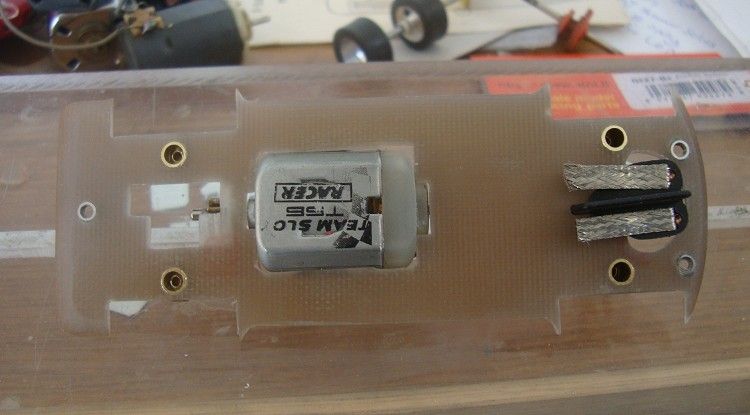
At this stage it is necessary to make sure everything fits in place and everything looks good in place.
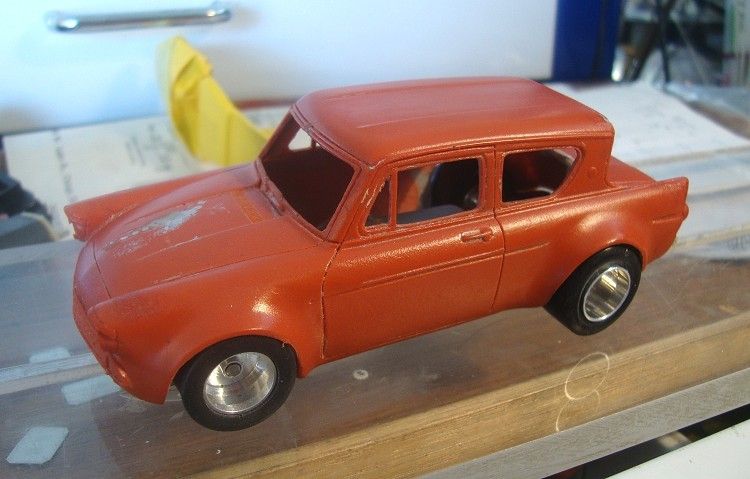
First coat goes on. This is enamel primer and is used firstly as a key for the following coats, but as importantly, it serves as a flat finish which will reveal any remaining defects in the body surface. Once remaining defects have been repaired, the repairs are dusted over with a light primer coat just to confirm the repairs.
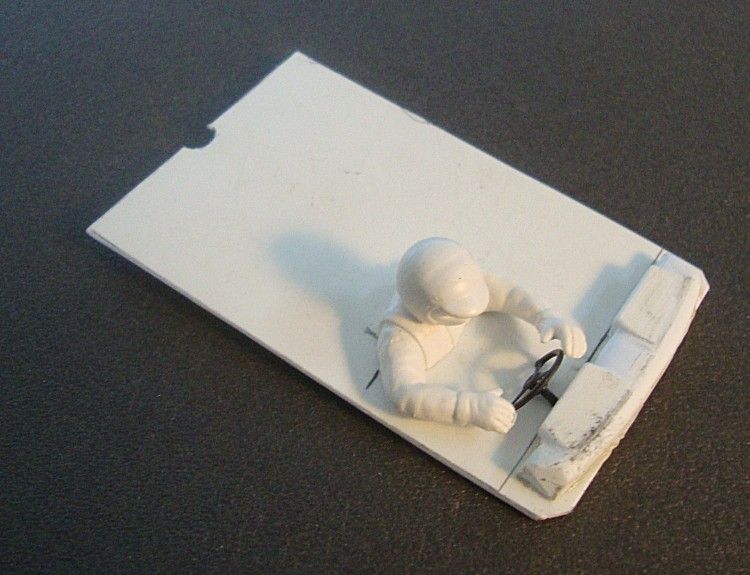
Next up is the driver’s tray; this is basic and carries just the driver and some dash details. In the classes we race we are not allowed to use vacuum formed parts or lexan driver trays, but, the solution is simple enough and it doesn’t take long to rustle up a driver’s tray from plastic card and an old Fly driver!

I have always short changed the interior detail on my race models for what ever reason, but in this case I actually went to the trouble of checking out some Anglia dashes on Google images so that I could make something reasonably representative; not sure why as it may never ever be looked at once the model is complete and the tray is sealed in place, still, the thought was there!
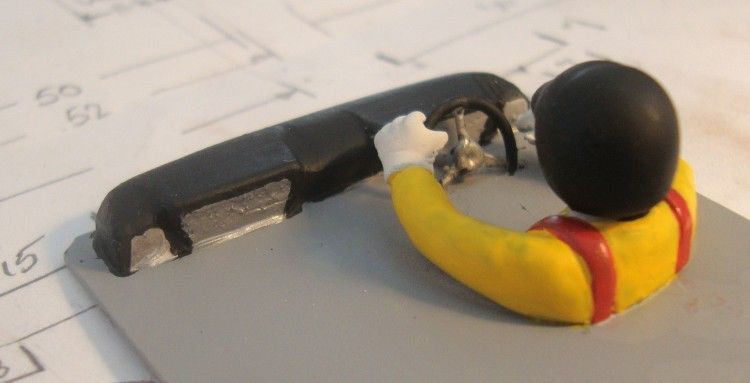
The driver gets a lick of paint too!
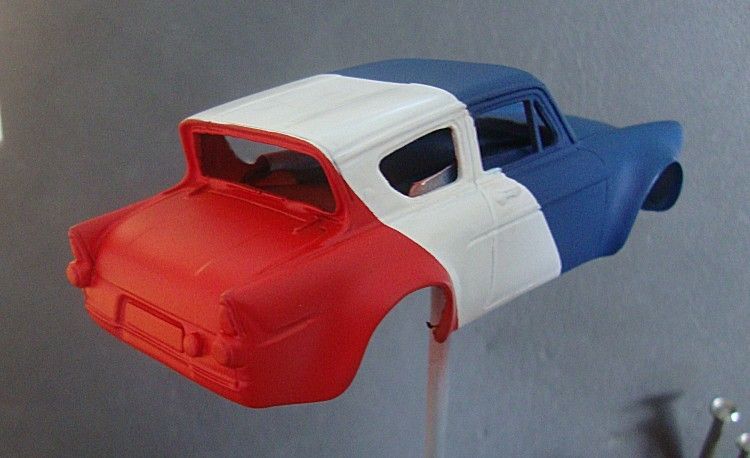
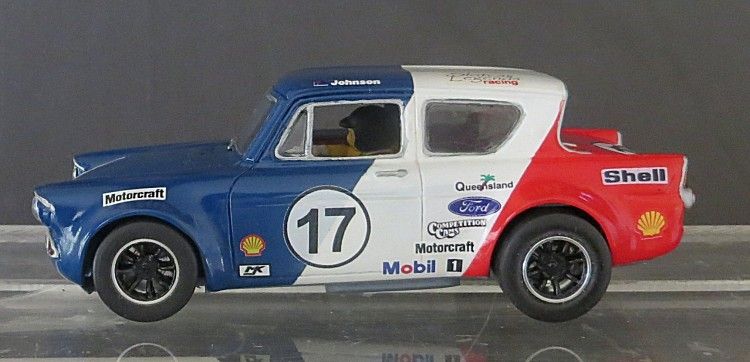
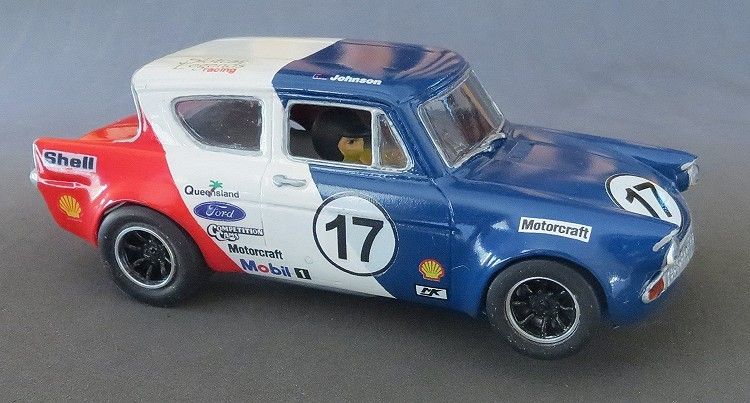
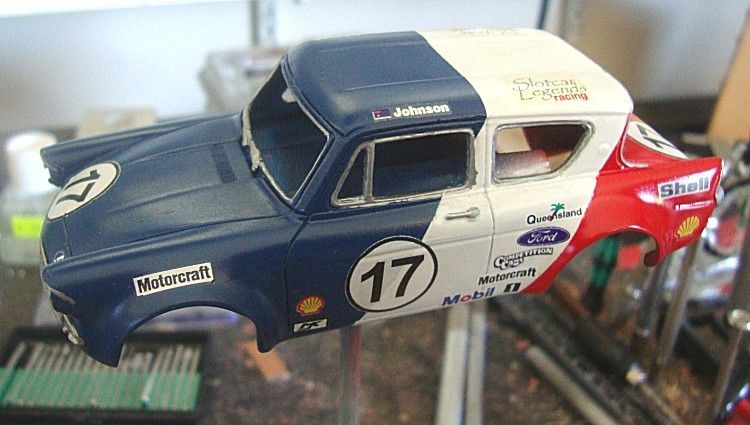
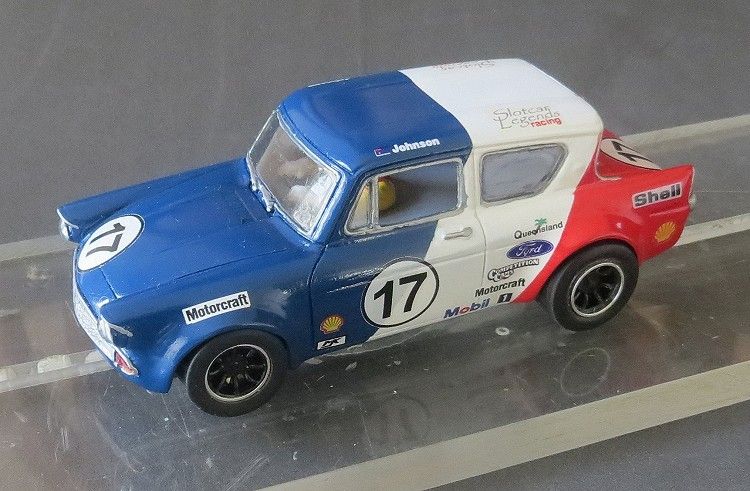
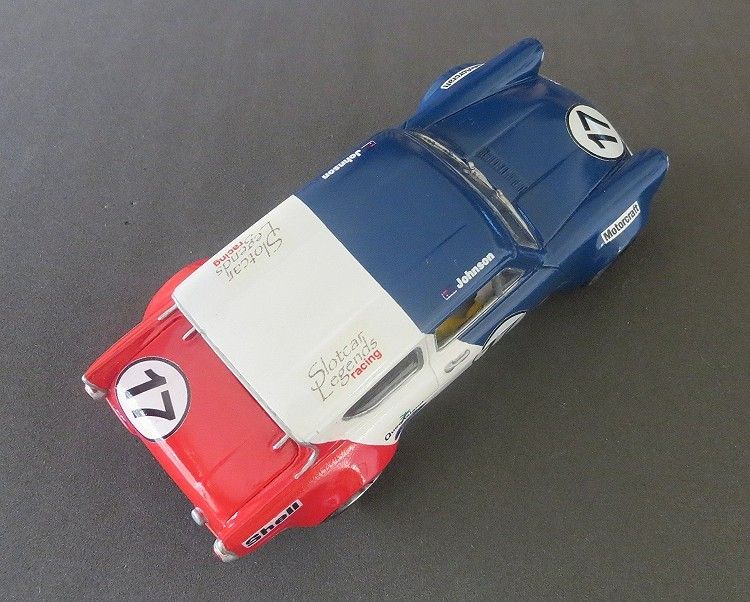
Colour scheme was next and after spending a while trying to come up with something impressive, I eventually settled for the AMC SUNOCO livery from the sixties. A bit cheeky I know but it is too good to waste on Javelins! The front was painted first and as such needed a good masking job. Next up was white and this too needed a foolproof masking job to prevent bleed under the masking tape. The trick is to mask with thin Tamiya tape (6 m.m.?) to the exact places, next, ordinary masking tape can be applied to the Tamiya tape and lastly broader tape is used to cover the rest of the body you want to keep clean. Then, the edge of the Tamiya tape where it sticks to the body, is brushed with a thinned coat of clear enamel. This will seal the edge of the Tamiya tape and ensure there is no visible paint bleed onto the next colour zone. This was repeated for all the colours. Also, I have used flat enamel as the colour coat for reasons which will become obvious.
Flat (matt) enamel paints have better covering properties, by that I mean one thin coat of flat paint will usually conceal all the blemishes beneath it. Whereas, gloss paints in general and colours like yellow and red in particular won’t hide blemishes like pre painting preparation even after you have applied several coats because they are semi opaque. The secret of flat paint’s covering ability in part is the coarse surface which it dries to; it is optically resistant to reflection and distorts light which tries to pass through it. It is also a good ‘key’ for further coats.
That is why, more and more, I use flat paints as the colour coat! If the primer coat has been applied properly, a liberally applied flat colour coat may only need one coat, this can be rubbed down with dry coarse linen or cotton to give a respectable sheen and still maintain its covering properties. To finish the model is then simple; a medium clear coat is applied next and once dry, the decals can be applied. After 24hours (not one hour as it sometimes says on the cans, the next coat can be applied. Once dry this can be lightly rubbed with 1200 grit to smooth any blemishes or orange peel, taking care not to sand through to the decals though.
Two or three more clear glosses can be applied observing the manufacturer’s drying and recoating instructions. The penultimate coat can be rubbed down with 1200 wet and dry before applying a heavy last coat. After applying the last coat I rotate the model slowly for two to three minutes, this allows the paint to thicken without causing it to run. The body is then left to dry for a couple of days. I almost exclusively use enamel paints now as acrylics mark easily for the first couple of months (especially in warm climates) before they really harden. Holding a freshly painted model on a hot day will see fingerprints appear in the gloss coat and if the paint has too many coats, even when cured, it will chip easily in racing incidents. I have had models pick up marks from objects leaning against them in the race box!! Enamel is a lot more durable, dries hard and will suffer the odd knock without marking.
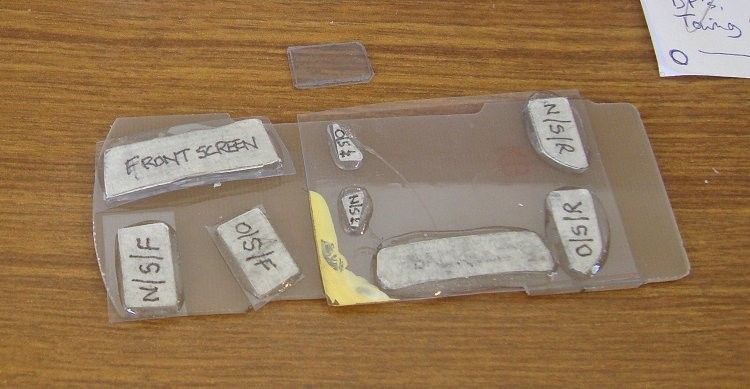
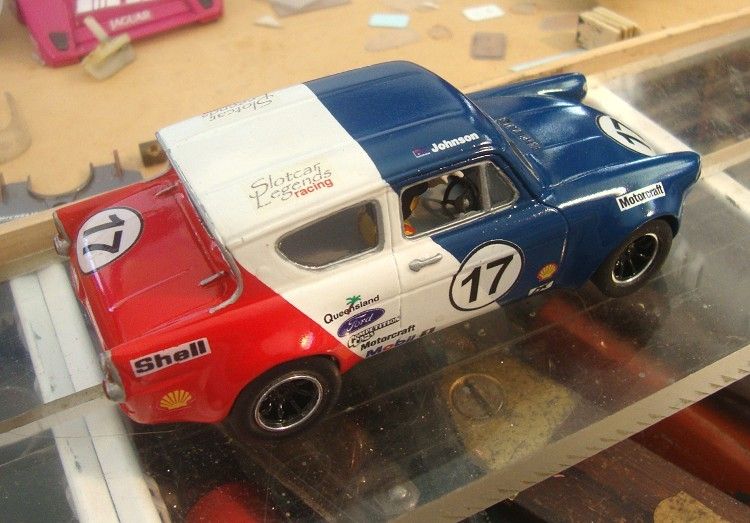
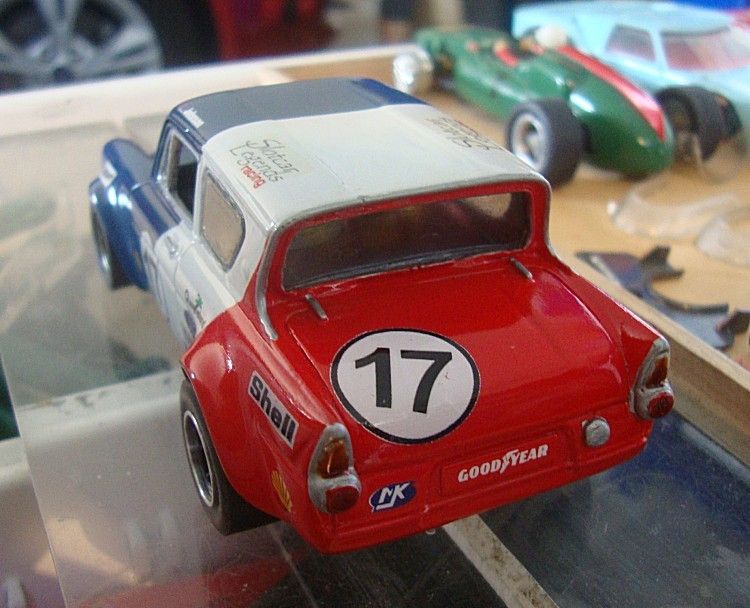
Once the body was painted I had to address the issue that the model had no clear parts!! I had some 0.5 m.m. clear plastic sheet (not acrylic) which I roughly cut to the window sizes. Masking tape was stuck on one side and the plastic was offered up to the window it was to fit. The opening was traced onto the tape and then the piece was cut to the drawing. It was then carefully filed until it was a snug fit in the window aperture. The glass was then fitted into the hole and mounted flush with the outside edge and using clear enamel, I painted a thick coat evenly over the clear part and onto the window frame.
Once dry it got a second coat and finally the outside also received a coat of clear. Care being taken not to leave brush marks in the clear. I still may give the body a last coat of clear yet just to smooth the overall paint job which still has the odd blemish in it.
Decals can be an issue too. With much time spent masking and spraying the last thing I need is for one or more of the decals to wrinkle when the clear coat is applied, trust me this happens and in spite of a whole range of products in the market place to prevent this, you still get caught out. The issue is a reaction to the solvents and drying agents in the paint. My solution is a can of Testor’s Decal Bonder. This is meant for decals which are applied to the inside of lexan and other vacuum formed bodies, but it is also very useful for coating decal sheets prior to cutting. A medium coat on your decal sheet will ensure your decals wont be ‘crinkle cut’ when the second coat of clear finish goes on. Again, I leave a treated sheet twenty four hours before using them.
All going well you should now be at that stage where you can take the model for a spin. A quick look round at the detail tells me there are a coupe of small paint jobs left to do. These are the light lenses. The lamps have been painted silver and all that is needed is some Tamiya ‘clear red’ and ‘clear orange’. Contrary to what I said earlier, this is acrylic paint, but it is used to pick out the small lamp details which it does admirably and lends a lifelike look to the lights. I didn’t use it before the enamel coats as enamel paint tends to cause it to run, even if it has been dry for weeks! So, I applied it last and gave the lights a thin coat of clear acrylic.
The chassis underside also got a brush painted coat of flat grey enamel just to tidy it up a bit. The chassis had to be washed off with shellite (lighter fuel) first as the model had been run when in the primer stage just to make sure all was OK, and as a consequence, there was an amount of oil and Vaseline on the underside.
The drivers tray is next, for simplicity in removal I have made it a slide in tray with some small tags having been cut and fixed to the inside of the body to hold the tray in place. The easiest way to do this is to assemble the tray and fit it in the upturned body trimming to size until it is a good fit in the body and the driver and dash are in relatively good positions. The three flat tags are laid in position on top of the driver’s tray and some extra strength epoxy is smeared for want of a better term, along the join that the tag has with the body taking care not to stick the tags to the tray! There is a small piece of round tube which stops the tray sliding forward which is removed should the tray need to come out. To remove, slide the tray forward until it clears the tag on the rear post, then, lifting the rear of the tray, slide backwards again till the tray clears the front tags, simple!
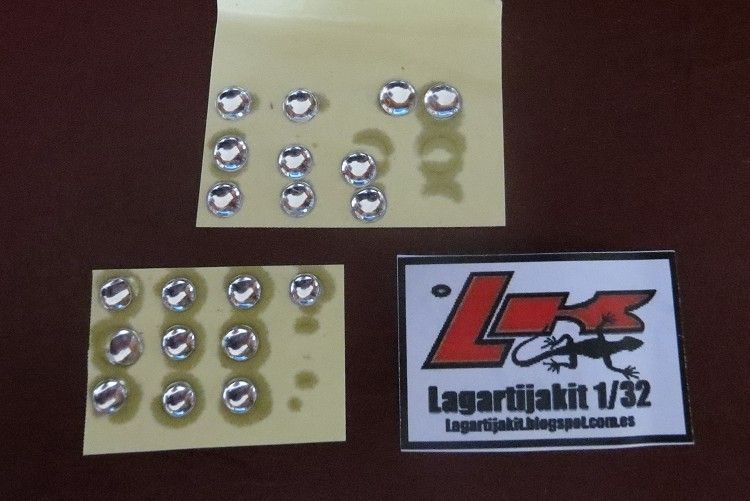
One of the last jobs was the headlights, these were obtained from Juan at Lagartijakit in Spain. The lights come in several sizes and the lights themselves have self adhesive backs to them. I chose to fit the lights more permanently by gluing them in place with an extra strength epoxy.
Lagartijakit
I will repeat that I could probably have made this model with finer detail, but as it is to become a track car it will soon pick up a few knocks and scuffs, so , unlike the shelf queens, it will need to wait for its retirement before it gets its final fettle. In the meantime I intend to have fun with it. So, that was it, with the waiting list on the hobby bench getting shorter I can pick the odd model waiting for attention and possibly spend a bit more time on them. Front of the queue is a 60’s Porsche 911 turbo by Arii and a resin Ferrari 250LM Berlinetta Mmmmmm decisions, decisions!