


Le Mans 2004
by Phil Wicks
Bold statement, I don’t think so. When travelling the slotcar fora we see a bunch of people that might be termed as SCM’s, but these names appear time and time again, day after day and these handful of people are truly unrepresentative of the great mass of slotcar buyers who DON’T let their feelings be known on forum after forum. People who empty the shelves of Mr Toys and the like week after week. The great slotcar buying public vote with their wallets and credit cards and if you ask retailers which models are doing well, this little classic will feature in their reply!!
So, what is the attraction, ?? I can’t honestly tell you, but if you have bought this model for magnet or board, you won’t regret it. It has a perfect ‘footprint’ for setting up for board and at 74 grams it is a slotcar lightweight which will endear itself to the magnet racer. Don’t forget, this is a modern GT car and not some ‘50’s classic sports car. If your club has rigid class lines, this can takes its place alongside Aston Martins, Ferraris and Porsches. And in its motor class I suspect it could well be a threat in the right hands! But time will tell! So, as I have said on many occasions, what’s it like?? I can only tell you my own experiences.

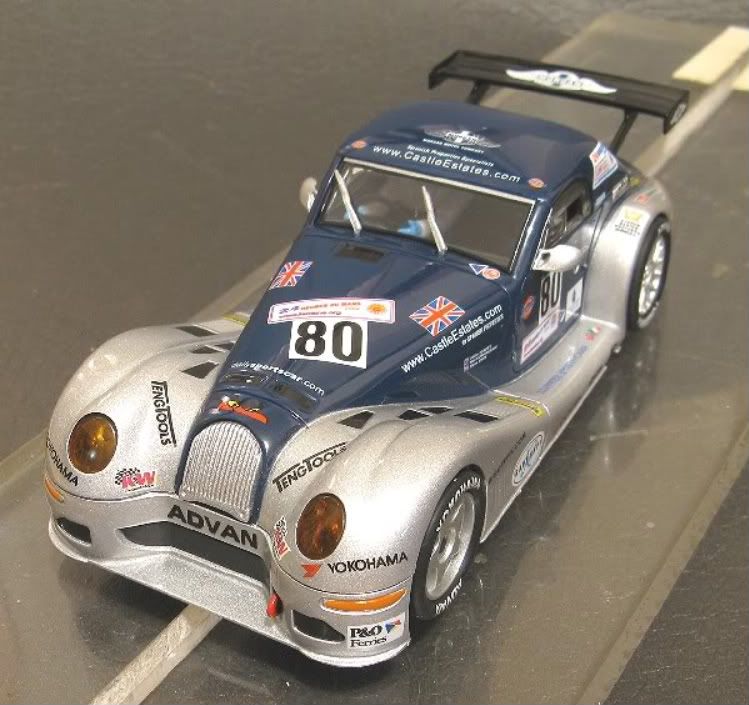
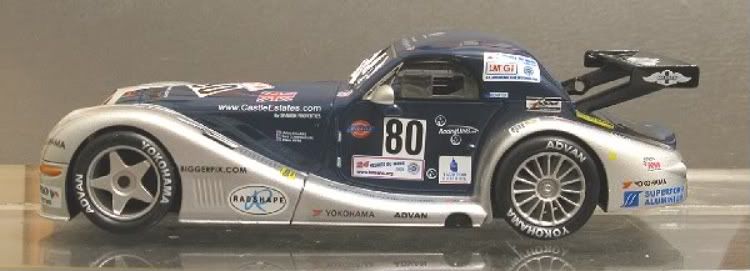
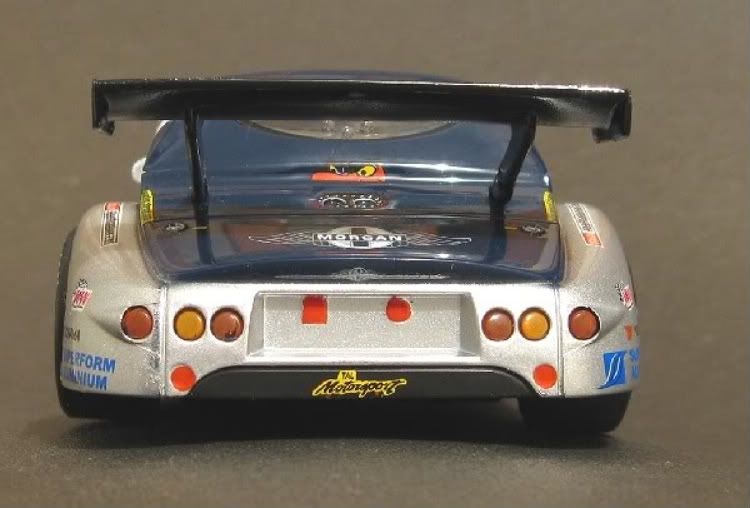
Excellent tampo all round
Firstly and foremostly is the striking tampo. Sharp edged and very defined. All the ‘decals’ are well reproduced. Take the drivers names on the side panels for instance. As small as they are, they are quite legible! The sponsors decals likewise. Very sharp, very crisp. They’ve even got the ‘Union Jack’ up the right way!!
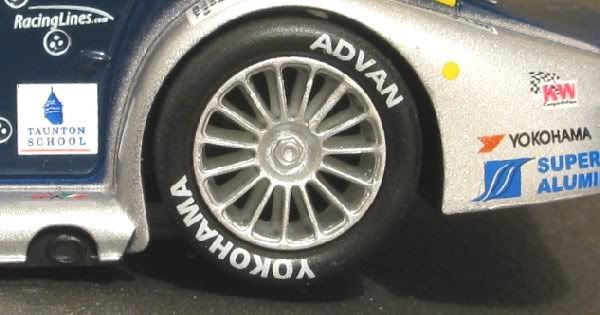
Printed tyres....wooow!
One of the biggest forward steps for me is that they have printed the tyre sidewall markings. This must be a first for SCX (I am prepared to be corrected). Previously they have applied some sort of decal which has a very short life and visibly peels off over a short period. The fine lines of the Morgan logo are well printed too.

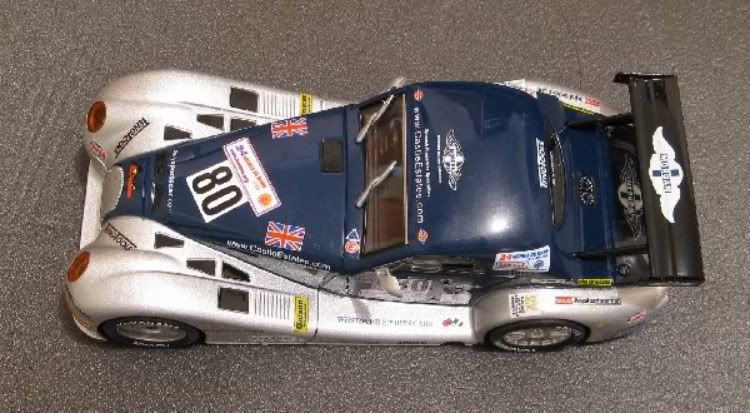
Disappointing spray on the rear wheel arch
The body colour too is good but the graininess of the silver is a bit unrealistic and on my model the left hand side body colours have feathered into each other where the spray mask has not fitted properly! Pity, I hope it isn’t a general malaise. Other than that, for the price it is a well presented model and worthy of a place in anyone’s slot box. This model has the tiniest of cockpits and SCX, bless them, have put a virtually impossible to see driver figure in place, complete with correct colour coordination. The rear wing has a bit of a weak spot in one of the pylons, where there is an unexplained hole through it. But a consolation is that the door mirrors are inside the roll over zone! All the time the model keeps its rear wing!!

Good fine detail on the boot and wing
Already there have been gripes and rumblings about the odd wheels; I honestly think we have got to do better than that. The wheels are fine and are representative of the 1/1. Not only that, they are pretty much concentric and absent of unwanted sprue flash. The tyres are one of my board track favourites, SCX type sevens. Although these seem harder than some, I don’t know what it is, but they never seem to be short of grip once bedded in and sanded. So much so to the point that some models, especially rally cars, can tend to tip in corners if you are not vigilant! And, they are concentric!

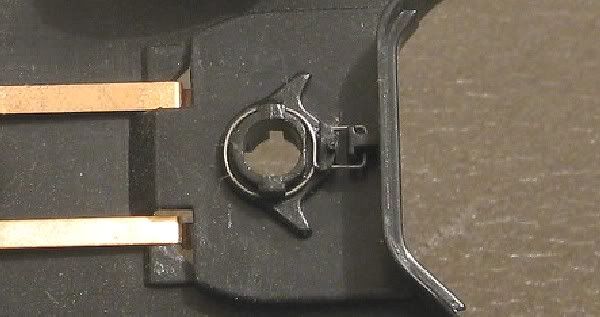
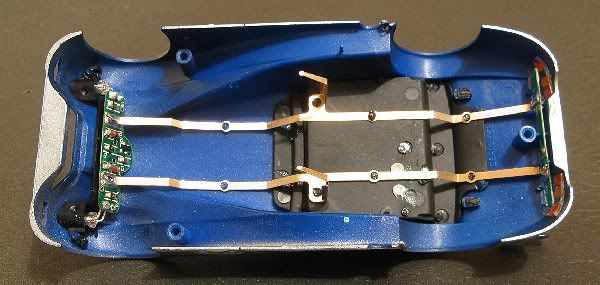
Underneath the model the chassis is flat and broad and the axle width too is surprisingly wide compared to the chassis length. The now proven motor pod sits squarely and the only other object in sight is the traditional SCX guide. Still nothing to write home about but effective I suppose even though it has more slop than I’m happy with. Removing the guide reveals the later style contacts which I first saw in the Zanini Seat. Instead of the ‘praying mantis’ type brass contacts which for some people seemed to get caught under the braids, SCX have opted for a couple of slipper type pick ups and have minimised the problems previously experienced.
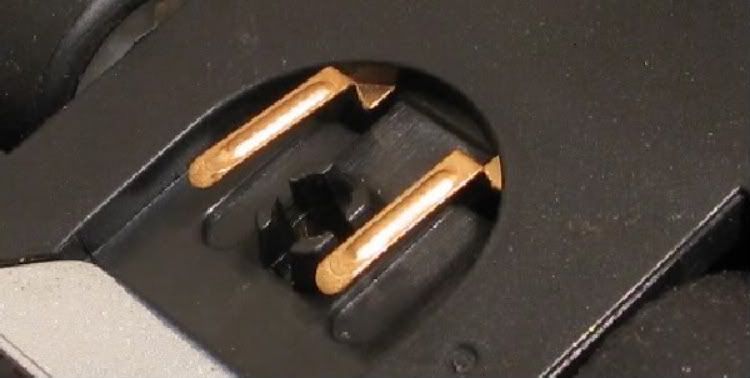
They have reasonable tension too so the continuity shouldn’t be affected. One pre requisite for SCX guides is to remove the blade and reposition the braid and press it firmly flat. It will have been hastily assembled during manufacturer and out of the box is less than adequate. While you are at it, ensure both the slipper contacts are level!
The slipper contacts will need attention
Three screws hold the bottom on which is a bit of a boon for us board racers as it presents minimal complications when setting the chassis body movement up. But having said that, this model with the moving motor pod shouldn’t need the body screws loosening?? The fact is that some of the SCX models suffer from wheels fouling the wheel arches when the chassis is loosened and there are some which do it when they’re tight!! My view is that it is possible to get the model to work well with a tight chassis and a set up pod although it can take a bit of fiddling. My advice is that if you are going to run a loose chassis, then glue the pod fast. If you are going to run the pod, then screw the chassis fast. It isn’t necessary to have both. On this model the rear tyres just clip the rear arches and there may well be need for some adjustment, but not until you have sanded the tyres. This creates a bit of extra clearance on its own.
The hole in the spoiler pylon? Apparently a tow line fixing point???
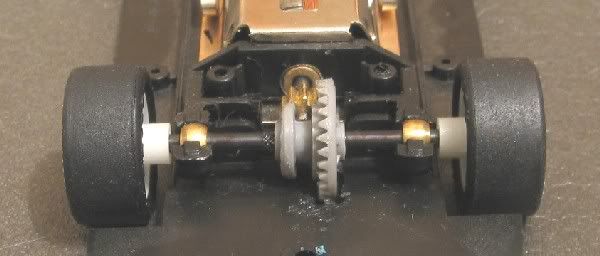
Inside, the revelation is the stub axle set up at the front. This is a bit of a novel approach to an old idea and SCX have made a fairly good job of it. Instead of settling for the common place bearing and pin arrangement ‘a la’ Fly and Revell, they have had the wheels assembled on very short stubs mounted through an independent bearer. This then clips into place in the front chassis, very effectively too, and a lot more rigid than conventional set ups.
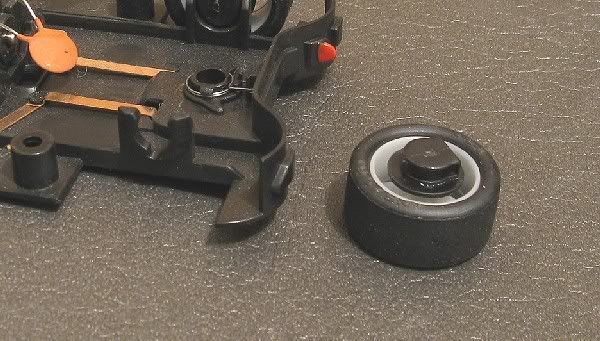
The novel front wheel mount,promotes front wheel differential.
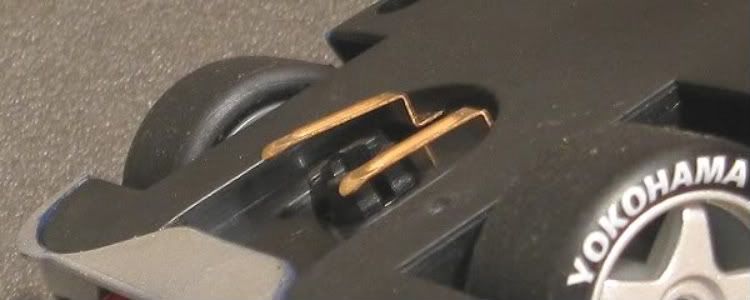
Once inside, there is the standard SCX tackle in the form of the pod, motor, rear axle bearings and final drive. No more surprises but there is a bit of an annoyance here. SCX use long springy contacts on the motor to probably aid assembly but it can be a source of poor contact if set up badly. These contacts have a bit of strength too and if you are not careful they will influence the stance of the model on the track in non magnet use. How do they do this? Simple.
The contact tension forces the motor and pod to the top of the slots (illustrated below). If all the slots were spot on it wouldn’t matter much but they aren’t. The injection moulding process has left flash at the rear end of the pod which causes the pod to rise unevenly. The cure is firstly to remove the pod and trim the excess away from the pod pins WITHOUT altering the pin dimensions. Do this with the motor removed and you’ll see what I mean. Once cleaned up and with the motor out, the chassis will sit perfectly square on a level surface. Before the motor is replaced the spring contacts are reshaped by turning down the last four or so mil of the contact so only the end of the contact touches the supply rails. This moves the leverage point forward several millimetres which reduces the spring tension on the pod but still retains a healthy load on the point of contact. You might even feel inclined to put a small spot of solder on either contact point just to confirm it!
Looking around, SCX have used yet another self centring guide design. This time very effective and not too springy to force the guide from the slot in a fast corner. But still we have the sloppy fit. Again, curable, but in this day and age, moulding tolerances could be, and are, better in other applications. So come on Mr SCX, one more hurdle to go!!
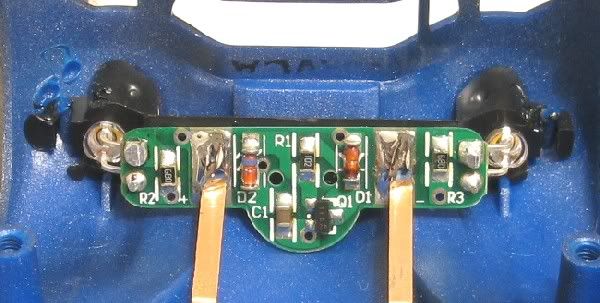
Inside the body the electrics are their tidiest yet. No mean feat either and some good lights they are too. The front LEDs sit in black holders and this is enough to stop light bleed so apparent on some of their other models. The light contacts to the supply rails is another reason to run this model with the chassis screws tight. There is a degree of springiness in the lighting contacts too, and these sidle up behind the motor contacts. Once in place the tension is enough to dampen any prospective movement between chassis and body and rather than struggle with it, or convert it to a miniature plug and socket as I did with the Brock Sierra, I am going to persevere with the pod and get it to work 100%.
Note one pin has sheared already (white dot in front of the rear wheel well)
Lastly, from an assembly point of view, there are two tiny pins on the underside of the body. Their only function in life seems to be to keep the body sides in position and stop them flexing. In another life there might well have been a couple of small screws here but they are not missed. On my model, one of the tiny pins separated itself on body removal!! Whilst looking at the problem I concluded they no longer served a genuine purpose and the second pin was duly removed!! This allowed an unencumbered chassis refit and removal.

So what’s it like on the track?? As always, with SCX you can wind the magnet down til it scrapes the rails. On a plastic track you would need to balance downforce with the speed trade off, i.e. Screw the magnet down just off the rails then screw it back up a quarter of a turn at a time, testing between adjustments until you think you have obtained effective adhesion without too much speed loss. On a board track it would be a little different. Run the model and set it up as best you can unmodify. Then, start to add mods until you are comfortable with it. The first requirement is that all the moving parts are working as designed and are lubed and there is no drag or resistance from any of the motive parts. Then, choose tyres if you are going to, THEN and only then consider adding ballast and carefully experiment with its position. The end result should be a well balanced moderately weighted model ready to take a few heats out.
I took the opportunity to run the model almost SOOB on a local board track, short and technical. After a few laps where the rear tyres were obviously patchy in grip, excess tail end movement was present and cornering speed paid a bit of a price. The model was doing 5.7’s. Not a bad time but not a race wining time. Later in the evening I had the opportunity to run the model again for a longer period. As the tyres settled in and as I got used to the model the time dropped down to a quickest lap of 5.4 seconds. This was a more healthy time for this track with fastest laps in other events for the evening only reaching 4.3’s.
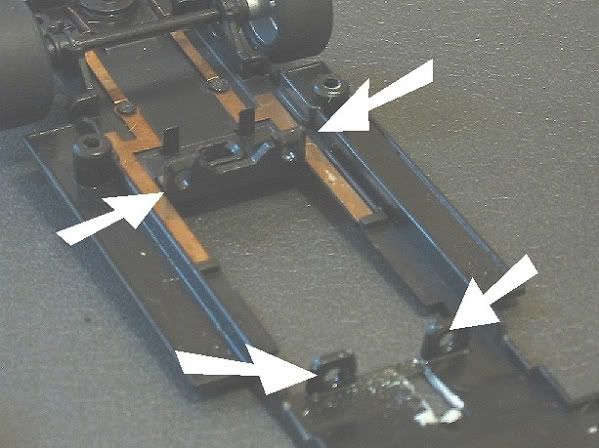
With either a little work on the original type seven tyres or a new set of MJK SCX Rally tyres I’m sure the 4.3 barrier would be easily accessible. I also feel this model with a little judicious ballast could be a contender in its GT motor class on driver tracks. The model showed one disturbing fault though. In the aftermath of a third party deslot, the model must have taken a hit on the motor pod from underneath! Now, SCX have modified the pod front mounts by leaving the loops open ended!! These previously were closed and the pod had to be pried in and out (see the Volvo S60 reviews this section).
The earlier Volvo pod mounts, enclosed!
But, because the new ones are open, a sharp blow to the underside will dislodge the pod. This is what happened to mine and as a consequence the rear tyres bound in the rear arches and the model refused to move. Nice one Mr SCX.............. NOT! Now how about changing it back! I now have to effect a modification to stop the pod coming out in a racing incident

The offending pod front mounts
But, suffice it to say, I haven’t seen the last of this model and as with some of its predecessors it will do doubt have a good few outings over the coming months.
Statistics

Wheelbase					78.5 m.m.
Front axle width				55.0 m.m.
Rear axle width					56.0 m.m.
Guide to rear axle				81.5m.m.
Overall weight					74.0grams
Rear axle load					43.0 grams
Front axle/guide load				31.0 grams
Front / rear weight dist			42.0% / 58%
Body weight					21.0 grams
Pinion						9z nylon
Contrate					27z nylon
Final drive ratio 				3 : 1
Rear wheel diameter				19.71 m.m.
Progress					20.63 m.m. per motor rev.
Rear tyre tread width				8.2 m.m.
Guide length					20.0 m.m.
Guide depth					6.00m.m.
Guide thickness (median)			1.36 m.m.
Motor						RX 42
It’s interesting to note that SCX have used the RX42. I suspect that the main difference between this and the ‘b’ version is dimensional. The motor certainly performs well and is no slouch on the black stuff. As expected this model goes extremely well on both media and spending a couple of hours getting clearances correct and parts working is well worth the effort. I’ll give Mr SCX 9 out of 10 for this model (in spite of the pod mounts) and whereas there are heaps quicker cars about and more glitzy marques, I suspect this will still please the casual racer long after his Slot.its and Ferraris have fallen from grace!
