


At local slotcar meetings I invariably come away with one model and sometimes more, with a request to repair it or get it running nicely. The most common problem I encounter is a broken body mount, being the tube part which is usually a moulded part of the body. To the average hobbyist it is outside of their scope to repair these and any repair they do carry out is tongue in cheek and soon becomes a continuing source of aggravation and failure. Some slotcar manufacturers supply few if any spares. Others will have a whole catalogue of replacement parts, but very few (almost none, in fact!) supply bodies as spare parts! So the demise of a critical mounting post can seem daunting to the average racer.
After using several different methods for mounting bodies on my scratchbuilds, I have settled on a system which is reliable and very ‘body tuning’ friendly. It is as good as a copy of the traditional round post which has been around in slotcar racing almost since its inception. The person who first utilised this system should have it named after him (or her) so universal is it now that, along with four wheels, as far as one can see into the future, slotcars will have body mounting posts!

The primary objective is to make a mounting post from readily available material. The tube in question is polystyrene tube available fro all good hobby stores. Its vital function is that it will ‘telescope’ snugly inside itself, allowing a sturdy post to be made from three (or more) relatively thin tubes. First up is to cut the tubes to length, or a bit over actually, so they can eventually be trimmed to size. Next, the two inner tubes have liquid polystyrene cement applied lightly to bot the outside of the inserted tuber and the inside of the receiving tube. This is so adhesive isn’t scraped off as the tubes are assembled.
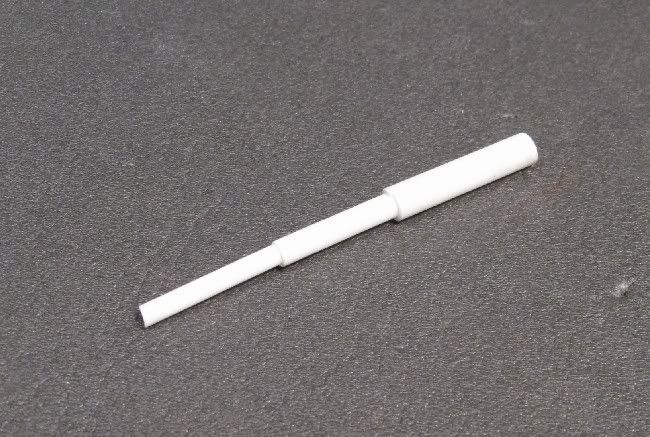
Once all three tubes are combined, the item is left for 24 hours to dry and cure. It will be detrimental to start cutting threads into a half dried inner tube. Next up is a small drill! It is unlikely that the gauge 2 thread of a screw is matched to the diameter of the inner tube, therefore, the inner tube will need to be taken out slightly to minimise stress when the screw is fitted for the first time. You might want to experiment on some scrap material before going ahead with this stage. Anyhow, once dry I carefully and slowly screw the screws to be used into the posts to their full depth. Once all are threaded I then level off the end of the post which carries the thread. This is done by inserting the post into a small drill chuck and running it up. The sharp blade of a modeller’s knife is then applied across the top (end) of the tube. The blade will scrape the uneven end of the tube down to a level surface. Ensure the knife blade is sitting on both sides of the tube while doing this.

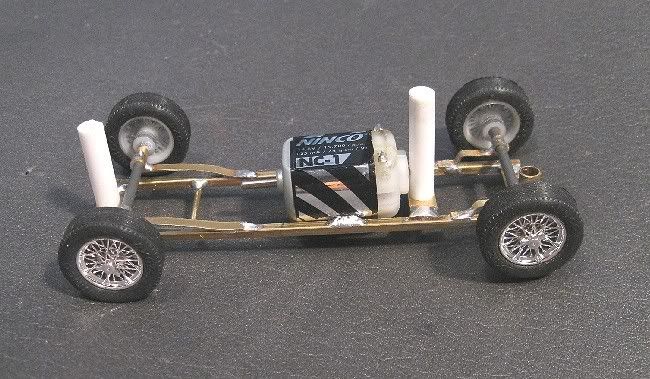
Next, the tubes are assembled in position onto the chassis they are to hold. The chassis is inserted into the body and the proud height is measured. This will determine how much surplus is to be cut from the untapped end of the post. The ‘proud’ height is the difference between the position of the chassis in final place of rest and the current position when held out of place by the over length tubes. Measure carefully and allow a mil or so for final adjustment.
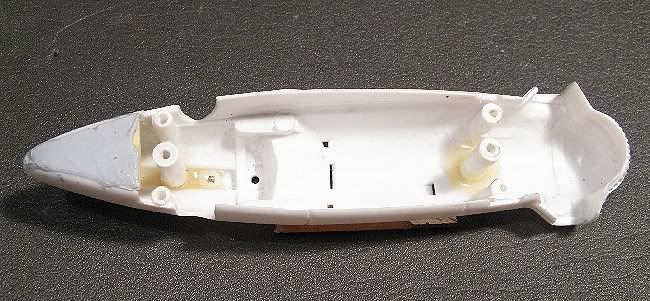
Once ready I crosshatch the untapped end of the tubes and the position in the body where they will locate with the point of the modeller’s knife. Assuming the chassis is already self positioning, it is a simple case of applying epoxy resin to the scored end of the tube and the scored patch on the body. The chassis is then placed in position on the inverted body and left to dry. Some of the resin on the tubes will run down and reinforce the joint. On a body without chassis stops you may need to mount the chassis in three places instead of two. If you want to use only two, on a sedan (saloon) car it is possible to wrap two layers (or more) of masking tape around the model’s tyres to form tubes. The model can then rest on these tubes in the wheel arches while the epoxy sets and if the body is true you will end up with the chassis spot on in position.
Lastly, if you feel inclined, you can add a little extra epoxy around the base of the mounts to give added strength if you feel that the model may be involved in some more robust types of racing!
This system I have also used for successfully repairing damaged posts on RTR models too. The only variation is that the damaged post is trimmed back to the base of the damage and a brass tube is inserted over the stump. Then the plastic insert is added inside the brass tube.

